PITCHING MECHANICS MADE SIMPLE
Over the last few years there has been a lot of emphasis on proper mechanics for a pitcher. Every clinic that I have attended has at least one of the coaches going over the proper mechanics of the throw. There have been several books written on mechanics and there are many private instructors now basing their entire approach to teaching pitching on mechanics. Proper mechanics are important but I have experienced many pitchers going out to the mound in a game being more concerned with their mechanics than they are in getting the hitters out and winning the game. There are many pitchers in the Big Leagues with less than perfect mechanics. It seems though that the ones who stay around the longest with the least amount of injuries are the ones with good solid mechanics.
Pure and simple the purpose of good mechanics is to allow the pitcher to obtain maximum velocity with the least amount of effort and to help protect the throwing arm from injury. One thing proper mechanics won’t do is guarantee good control. Consistent mechanics, good or bad, coupled with relaxation and concentration and thousands of repetitions produce good control.
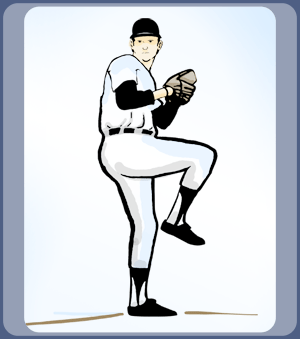
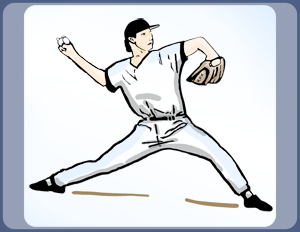
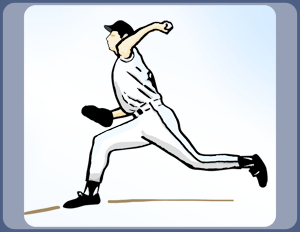
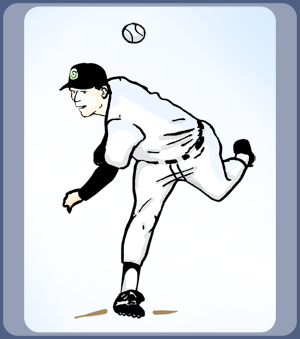
I have divided the pitch into four segments or phases, the Windup, Stride, Throw, and Follow Through. As a coach there are key points that I observe or look for in each phase. I have included an illustration for each segment of the throw with highlights to help you to identify those key points.
Windup
 The windup as the initial segment of the delivery begins to get your body in the correct position to travel toward the plate. Its purpose is the same whether you start from the set position or from the normal windup. It should be done in a very relaxed manner. Some of the key aspects of this phase are:
If in the regular windup, the pitcher should step back across and slightly to the side of the rubber. (note: Generally speaking Right handers should pitch off the right side of the rubber and left handers should pitch off the left side of the rubber.
The pivot foot should be placed in front of and parallel to the rubber. It should not be on top of or on the side of the rubber.
Is the leg kick made by raising the knee and not by swinging the foot?
KEY At the top of the leg kick the body should be balanced and slightly tucked.
As the lower body begins to go toward the plate the upper body weight should stay back and the hands should begin to separate.
The knee should begin to drop as the body begins to move toward home plate.
Stride
 The stride in pitching is very similar to the stride in hitting except that it is longer. It serves the same purpose in that it should get the body in the best position to rotate the hips and explode toward the plate. The real push of the pitcher should not occur till the front foot is about to or is hitting the ground. Some key aspects of the stride are:
The stride should be straight toward the plate as opposed to way open or across the body. Many pitchers today throw a little across their body, (one to three inches).
As the throwing hand comes out of the glove the wrist should not consciously flex but should stay loose and begin to slightly extend as the hand comes up to a throwing position.
The trunk should stay slightly tucked but not exaggerated.
Shoulders should stay closed with the front shoulder being higher than the throwing shoulder.
The front knee should stay closed as long as possible.
The head should stay toward the back all the way till the front foot hits the ground.
KEY As the front foot hits the ground the throwing arm should be in the throwing position, i.e. elbow cocked ninety degrees and the elbow the same height as the shoulder. The fingers should be over the ball and pointing back.
The lead arm elbow as the foot hits the ground should be closed and the same height as the shoulder.
The front knee should flex as the foot hits the ground.
Throw
 Everything that the pitcher does up to this point has gotten him ready to throw or ultimately to explode the arm toward the plate. The throw should be initiated by the hard push into the front side and the rotation of the hips. Some of the key aspects of the throw are:
The hips start to turn before the shoulders.
The throwing elbow should be flexed 70 – 115 degrees till just before release.
The throwing shoulder should be abducted 90 – 100 degrees at release.
The trunk should be flexed 50 – 65 degrees at release.
As the hips turn the lead arm elbow should go down and tuck into the body.
KEY: The trunk and head are behind the front knee at release. At release the lead leg straightens, or extends.
Head movement throughout the throw should be limited with the eyes staying parallel to the plate and fine centered on the target.
KEY At release the back foot should be turned over and the back side leg extended.
The fingers should stay over the ball.
There is a conscious effort to explode the throwing hand through the target.
Follow Through
 The follow through is the deceleration phase. If the other three phases have been done properly the follow through is almost automatic. Some aspects of the follow through are:
Trunk flexion continues after release but is not excessive.
The head movement is little and the eyes should stay parallel to the ground.
The throwing arm should stay loose and stop by itself.
The back leg continues up then around and down. It should be under control to allow the pitcher to get ready to field.
By focusing on these keys, especially the ones that are highlighted a pitcher can develop good sound mechanics. They must be repeated properly thousands of times to become consistent. Remember once you cross the lines the focus is on getting the hitter out, not good mechanics.
By Geoff Zahn
Former Head Baseball Coach University of Michigan and 12 Year Major League Veteran Pitcher
